Swapping Images With Built-In Image Rollover Code
Swap images with just a "mouseover."
Put two images on the page. One of the images is visible, the other not.
When the mouse moves over the first image, it is replaced with the second image. When the mouse moves off the second image, it is replaced with the first image.
The image rollover functionality is inserted into the image tag, built right in. It may be the easiest image switch code on the Internet.
One caveat: The two images should have the same dimensions. Otherwise, the rest of the content on the page may be shifted around to accommodate the different image sizes as one or the other is displayed.
Here is a live example:
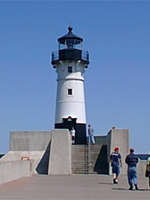
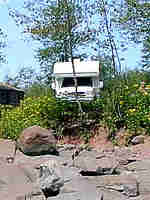
The live example has been put into a div for floating the image to the left. The div is optional.
The images can be anywhere images can be — in a floating div, in a table, between center tags, just flowing with the rest the content — and the technique in this article will still work.
The technique is that two image tags are published, together, instead of just one.
Both image tags are given attributes to specify display status. The first image tag is to be visible when the page loads. The second only when the mouse moves over the first.
Then, JavaScript is put directly into the two image tags to provide the rollover functionality. This JavaScript does all the work of switching the images back and forth.
Here is the source code for the live example rollover.
<img
   src="//www.willmaster.com/images/lightfocus/smCanalParklighthouse.jpg"
   width="150"
   height="200"
   border="0"
   id="image1"
   style="display:inline;"
   onmouseover="document.getElementById('image1').style.display='none';
                document.getElementById('image2').style.display='inline';"
   alt="Canal Park Lighthouse" />
<img
   src="//www.willmaster.com/images/lightfocus/smdanceronbrighton.jpg"
   width="150"
   height="200"
   border="0"
   id="image2"
   style="display:none;"
   onmouseout="document.getElementById('image2').style.display='none';
               document.getElementById('image1').style.display='inline';"
   alt="Brighton Beach" />
Notice that there are two image tags. The width, height, and border of both are identical.
Each image tag has three attributes not usually found in image tags:
-
id="______"
Each of the images has an id value. The id must be unique on the page.
In the examples, the id's are "image1" and "image2".
-
style="______"
The first image has a "display:inline;" style. The second "display:none;".
Those values cause the first image to display and the second to not display when the web page first loads.
-
Either onmouseover="______" (the first image) or onmouseout="______" (the second image).
-
This is the attribute for the first image.
onmouseover="document.getElementById('image1').style.display='none'; document.getElementById('image2').style.display='inline';" -
This is the attribute for the second image.
onmouseout="document.getElementById('image2').style.display='none';
            document.getElementById('image1').style.display='inline';"
Notice they are nearly identical.
The first image attribute is onmouseover and the specified id's are first 'image1' and then 'image2'. That causes the id 'image1' to undisplay and id 'image2' to display when the mouse moves over the image.
The second image attribute is onmouseout and the specified id's are first 'image2' and then 'image1'. That causes the id 'image2' to undisplay and id 'image1' to display when the mouse moves off the image.
-
Just reading this, it might appear complicated. It is sophisticated, but not complicated.
If you'll paste the code into a web page and tweak this and that, viewing it in a brower after each tweak, you'll soon realize the code really is rather easy to implement.
The "Image Rollover Generator" in the WebSite's Secret area makes this technique even easier to produce. Fill in the form, click the button, then copy 'n paste.
If you have more than one place on a page where images will be switched, remember to use a unique id value for each image. If you do that, and keep the original code from this page handy for reference, expect to soon be a smiling website owner.
If you would like to see what the "Image Rollover Generator" looks like, click here. But realize that you will need to have a membership and be logged into the WebSite's Secret area before using the form.
Will Bontrager