
Will Bontrager Blogs Website Techniques
WillMaster > Blog > PHP
Testing a URL
Every so often, a person just wants to know if a URL is valid.
This is especially true for website programmers. URLs are used frequently. It may be for a redirect. Or it may be a thank-you page URL. Perhaps the script is designed to post data to a URL.
In those cases, depending on the script you are writing, it may be prudent to test the URL's validity before you engage with it.
The TestWebPageURL() PHP function is used to verify a URL is valid and reachable.
To use the function, include the TestWebPageURL() function within your script. Then call the function with a URL to test. The function returns an array with information it collected, including the status code.
Here is the source code for the TestWebPageURL() function.
function TestWebPageURL($url)
{
   $options = array(
      CURLOPT_RETURNTRANSFER => true,
      CURLOPT_HEADER         => false,
      CURLOPT_CONNECTTIMEOUT => 120,
      CURLOPT_TIMEOUT        => 120,
      CURLOPT_FOLLOWLOCATION => true,
      CURLOPT_MAXREDIRS      => 10,
   );
   $ch = curl_init($url);
   curl_setopt_array($ch,$options);
   curl_exec($ch);
   $info = curl_getinfo($ch);
   $info['errno'] = curl_errno($ch);
   $info['errmsg'] = curl_error($ch) ;
   curl_close($ch);
   return $info;
} # function TestWebPageURL()
A demonstration PHP script comes with this article. It uses TestWebPageURL(). The script is copy and paste.
The demonstration script displays the HTTP status code of the URL you tested. It prints any error messages the test encountered. The script also notes the destination URL if any redirects were encountered during the test. At the end, the demonstration script publishes an array of information that was gathered during the test.
To use the demonstration script, copy the source code and save it with any *.php file name, testURL.php for example. Then upload it to your server.
<?php
/*
Test URL Demonstration
Version 1
May 5, 2026
Will Bontrager Software LLC
https://www.willmaster.com/
*/

if(empty($_GET['url']))
{
   $ta = explode('/',$_SERVER['PHP_SELF']);
   $thisScript = array_pop($ta);
   echo "Use parameter name 'url' and value of the URL to test. Example:<br><span style='font-size:130%;font-family:monospace;'>$thisScript?url=https://example.com/testing.php";
   exit;
}

// test the URL.
$info = TestWebPageURL($_GET['url']);

// echo this if there was a redirect.
if( $info['url']!=$_GET['url'] )
{
   echo <<< CHUNK
<div style="white-space:pre-wrap;">
URL <b>{$_GET['url']}</b>
redirects to <b>{$info['url']}</b>
</div>
CHUNK;
}

// always echo this.
echo <<< CHUNK
<div style="white-space:pre-wrap;">
URL <b>{$info['url']}</b> returns HTTP status code: <b>{$info['http_code']}</b>
</div>
CHUNK;

// echo this if there is an error message.
if( $info['errno']>0 )
{
   echo <<< CHUNK
<div style="white-space:pre-wrap;">
Error: <b>{$info['errmsg']}</b>
</div>
CHUNK;
}

// echo the entire information array.
echo '<pre>'.print_r($info,true).'</pre>';

function TestWebPageURL($url)
{
   $options = array(
      CURLOPT_RETURNTRANSFER => true,
      CURLOPT_HEADER         => false,
      CURLOPT_CONNECTTIMEOUT => 120,
      CURLOPT_TIMEOUT        => 120,
      CURLOPT_FOLLOWLOCATION => true,
      CURLOPT_MAXREDIRS      => 10,
   );
   $ch = curl_init($url);
   curl_setopt_array($ch,$options);
   curl_exec($ch);
   $info = curl_getinfo($ch);
   $info['errno'] = curl_errno($ch);
   $info['errmsg'] = curl_error($ch) ;
   curl_close($ch);
   return $info;
} # function TestWebPageURL()
?>
After it is uploaded, type the URL of the demonstration script into your browser. Append ?url= and the URL to test.
Example: testURL.php?url=https://example.com/testing.php
When you run the script, it displays data as described further above.
Any values in the array of information that the TestWebPageURL() function gathers may be used in your PHP script. Here is an example array of information.
Array
(
    [url] => https://www.willmaster.com/
    [content_type] => text/html; charset=UTF-8
    [http_code] => 200
    [header_size] => 406
    [request_size] => 106
    [filetime] => -1
    [ssl_verify_result] => 0
    [redirect_count] => 1
    [total_time] => 0.721025
    [namelookup_time] => 0.006239
    [connect_time] => 0.152778
    [pretransfer_time] => 0.479417
    [size_upload] => 0
    [size_download] => 29208
    [speed_download] => 40510
    [speed_upload] => 0
    [download_content_length] => 29208
    [upload_content_length] => -1
    [starttransfer_time] => 0.72038
    [redirect_time] => 0.316062
    [redirect_url] =>
    [primary_ip] => 66.33.193.44
    [certinfo] => Array
        (
        )

    [primary_port] => 443
    [local_ip] => 10.1.10.152
    [local_port] => 49485
    [http_version] => 3
    [protocol] => 2
    [ssl_verifyresult] => 0
    [scheme] => HTTPS
    [appconnect_time_us] => 478744
    [connect_time_us] => 152778
    [namelookup_time_us] => 6239
    [pretransfer_time_us] => 479417
    [redirect_time_us] => 316062
    [starttransfer_time_us] => 720380
    [total_time_us] => 721025
    [errno] => 0
    [errmsg] =>
)
To reiterate, TestWebPageURL() PHP function is used to verify a URL is valid and reachable. It returns an array of information that may be used in your PHP scripts.
To use the function, include TestWebPageURL() within your script. Then call the function with a URL to test.
(This content first appeared in Possibilities newsletter.)
WillMaster > Blog > CSS
'Loading' Icon Animation With CSS
Here are steps to make an animation to indicate content is loading:
- Make an image to rotate.
- Rotate it with CSS.
- Smile.
The code in this article was made to rotate an icon image, although the code can be used to rotate any image. In other words, you might have other uses for it.
The image you specify rotates continuously at a speed you specify.
The following demonstration rotates an icon 360° every 2.5 seconds.

Before I present the code, I want to mention that there are pure CSS loading animations. A search for "CSS loading code" should reveal a bunch. In general, no image is required for those, but they are limited to what CSS can do by itself. I like a bit more flexibility. Which is why I rotate an image.
Here is the code for the above demonstration.
<!-- The CSS. -->
<style type="text/css">
@keyframes rotation {
   from { transform:rotate(0deg); }
   to   { transform:rotate(359deg); }
}
.loading-image { animation:rotation 2.5s infinite linear; }
</style>

<!-- Place the image where you want the icon positioned when it is animated. -->
<div style="text-align:center;">
<img class="loading-image" src="https://willmaster.com/images/loadingicon.png" style="width:50px; height:50px;">
</div>
Implementing Icon Animation With CSS
As you can see, there are two parts in the above source code. There is (i) the CSS and (ii) the image. Go ahead and place the image where you want it to rotate, then do the rest of the implementation.
-
The CSS class is named
loading-imageand is used in both the CSS and in theimgtag. If the CSS class name is changed, both places in the code need to be changed. -
The
2.5sis within the value of the CSSloading-imagedefinition. The value specifies the amount of time to elapse for each complete rotation.2.5smeans 2.5 seconds. Change the number as appropriate for your implementation.
The icon animation has been implemented. Try it in your browser.
Any image can be continuously rotated at any speed. Your imagination is likely to come up with additional ways to use the functionality.
(This article first appeared with an issue of the Possibilities newsletter.)
WillMaster > Blog > PHP
Random Characters Function
Often I have use for random characters in my PHP scripts. I've tweaked my go-to function from time to time over the years. The latest version comes with this article.
A random character or a series of random characters may be needed for a filename, a password, a security implementation (to make something virtually unguessable, for example), or any of several other reasons.
Here is the function.
function AppendRandomCharacter($s='',$howmany=1,$chars='abcdefghijklmnopqrstuvwxyzABCDEFGHIJKLMNOPQRSTUVWXYZ0123456789')
{
   if(!strlen($chars)) { $chars='-'; }
   $endchar = strlen($chars)-1;
   for($i=0; $i<$howmany; $i++) { $s .= substr($chars,mt_rand(0,$endchar),1); }
   return $s;
} # function AppendRandomCharacter()
To use the AppendRandomCharacter() function, paste it into your PHP code. Then call the function with zero or up to three values.
The code below calls AppendRandomCharacter(), which returns 1 random character. The character is then printed to your browser:
$string = AppendRandomCharacter();
echo($string);
You can specify up to three values when you call the AppendRandomCharacter() function. Here are examples.
// To obtain 20 random characters.
$string = AppendRandomCharacter("",20);
echo($string);

// To obtain 20 random numbers
$string = AppendRandomCharacter("",20,"0123456789");
echo($string);

// To append 1 random character to the $string variable.
$string = "test"
$string = AppendRandomCharacter($string);
echo($string);

// To append 20 random characters to the $string variable.
$string = "test"
$string = AppendRandomCharacter($string,20);
echo($string);

// To append 20 random numbers to the $string variable.
$string = "test"
$string = AppendRandomCharacter($string,20,"0123456789");
echo($string);
The demonstration script (available further below) can be used to become familiar with other ways to use the function.
Here is a description of the three values that may be used with the AppendRandomCharacter() function.
-
A string, which may be blank. (Blank is also the default.) AppendRandomCharacter() appends random characters to a string and returns the result. If the string is blank, then only the random character is returned.
As an example, if the string is "Will" and the random character is "Y", then the function would return "WillY". If the string is blank, the function would return "Y".
-
A number, which should be more than zero. (The number 1 is the default.) The specified number (or the default) tells the function how many random characters to return.
-
A string of one or more characters from which random characters are selected. (The default is s 62 characters composed of 26 lower-case letters, 26 upper-case letters, and 10 digits.) If you specify a string and the string is empty, the function will assume the ("-") hyphen character for random selection.
The function will make a fresh selection from the string for every character it needs; thus, you may find duplicate selections. If the string has only one character, that character will be selected as the random character every time.
I'll provide the source code of a demonstration script in a moment. First, here is a screenshot of what the demonstration script prints.
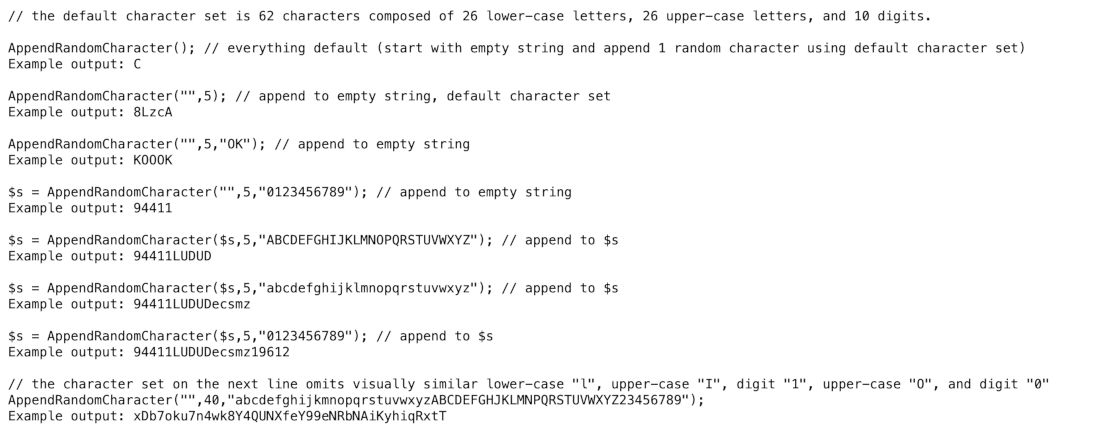
The demonstration script is designed so you can insert your own tests.
Here is the source code.
<?php
/*
AppendRandomCharacter() Function Demonstration
Version 1.0
April 8, 2025
Will Bontrager Software LLC
https://www.willmaster.com/
*/

echo '<pre>';
echo "// the default character set is 62 characters composed of 26 lower-case letters, 26 upper-case letters, and 10 digits.";
echo "\n\nAppendRandomCharacter(); // everything default (start with empty string and append 1 random character using default character set)\nExample output: " . AppendRandomCharacter();
echo "\n\nAppendRandomCharacter(\"\",5); // append to empty string, default character set\nExample output: " . AppendRandomCharacter("",5);
echo "\n\nAppendRandomCharacter(\"\",5,\"OK\"); // append to empty string\nExample output: " . AppendRandomCharacter("",5,"OK");
echo "\n\n\$s = AppendRandomCharacter(\"\",5,\"0123456789\"); // append to empty string\nExample output: " . $s = AppendRandomCharacter("",5,"0123456789");
echo "\n\n\$s = AppendRandomCharacter(\$s,5,\"ABCDEFGHIJKLMNOPQRSTUVWXYZ\"); // append to \$s\nExample output: " . $s = AppendRandomCharacter($s,5,"ABCDEFGHIJKLMNOPQRSTUVWXYZ");
echo "\n\n\$s = AppendRandomCharacter(\$s,5,\"abcdefghijklmnopqrstuvwxyz\"); // append to \$s\nExample output: " . $s = AppendRandomCharacter($s,5,"abcdefghijklmnopqrstuvwxyz");
echo "\n\n\$s = AppendRandomCharacter(\$s,5,\"0123456789\"); // append to \$s\nExample output: " . $s = AppendRandomCharacter($s,5,"0123456789");
echo "\n\n".'// the character set on the next line omits visually similar lower-case "l", upper-case "I", digit "1", upper-case "O", and digit "0"';
echo "\nAppendRandomCharacter(\"\",40,\"abcdefghijkmnopqrstuvwxyzABCDEFGHJKLMNPQRSTUVWXYZ23456789\");\nExample output: " . AppendRandomCharacter("",40,"abcdefghijkmnopqrstuvwxyzABCDEFGHJKLMNPQRSTUVWXYZ23456789");
echo '</pre>';

function AppendRandomCharacter($s='',$howmany=1,$chars='abcdefghijklmnopqrstuvwxyzABCDEFGHIJKLMNOPQRSTUVWXYZ0123456789')
{
   if(!strlen($chars)) { $chars='-'; }
   $endchar = strlen($chars)-1;
   for($i=0; $i<$howmany; $i++) { $s .= substr($chars,mt_rand(0,$endchar),1); }
   return $s;
} # function AppendRandomCharacter()
?>
Give the demonstration script any valid *.php file name. Upload it to at any public accessible location on your server. Then type its URL into your browser.
The AppendRandomCharacter() function is ultra-easy to implement. Pop the function into your PHP script and you're good to go
(This content first appeared in Possibilities newsletter.)
WillMaster > Blog > Tips and Tricks
Amazon Hardcover and Paperback Book Cover Measurements
I publish a number of books. The Books at Bontrager Connection index page lists a dozen or so. In addition to ebooks, some of them are published as hardcover and paperback books.
To publish hardcover or paperback, assuming you create your own covers, a custom template can be generated at Amazon. They call it a calculator. Tap kdp.amazon.com/en_US/cover-calculator to use the calculator.
The image below is an example of what the calculator responds with. The calculator was used for a recent hardcover book I published.
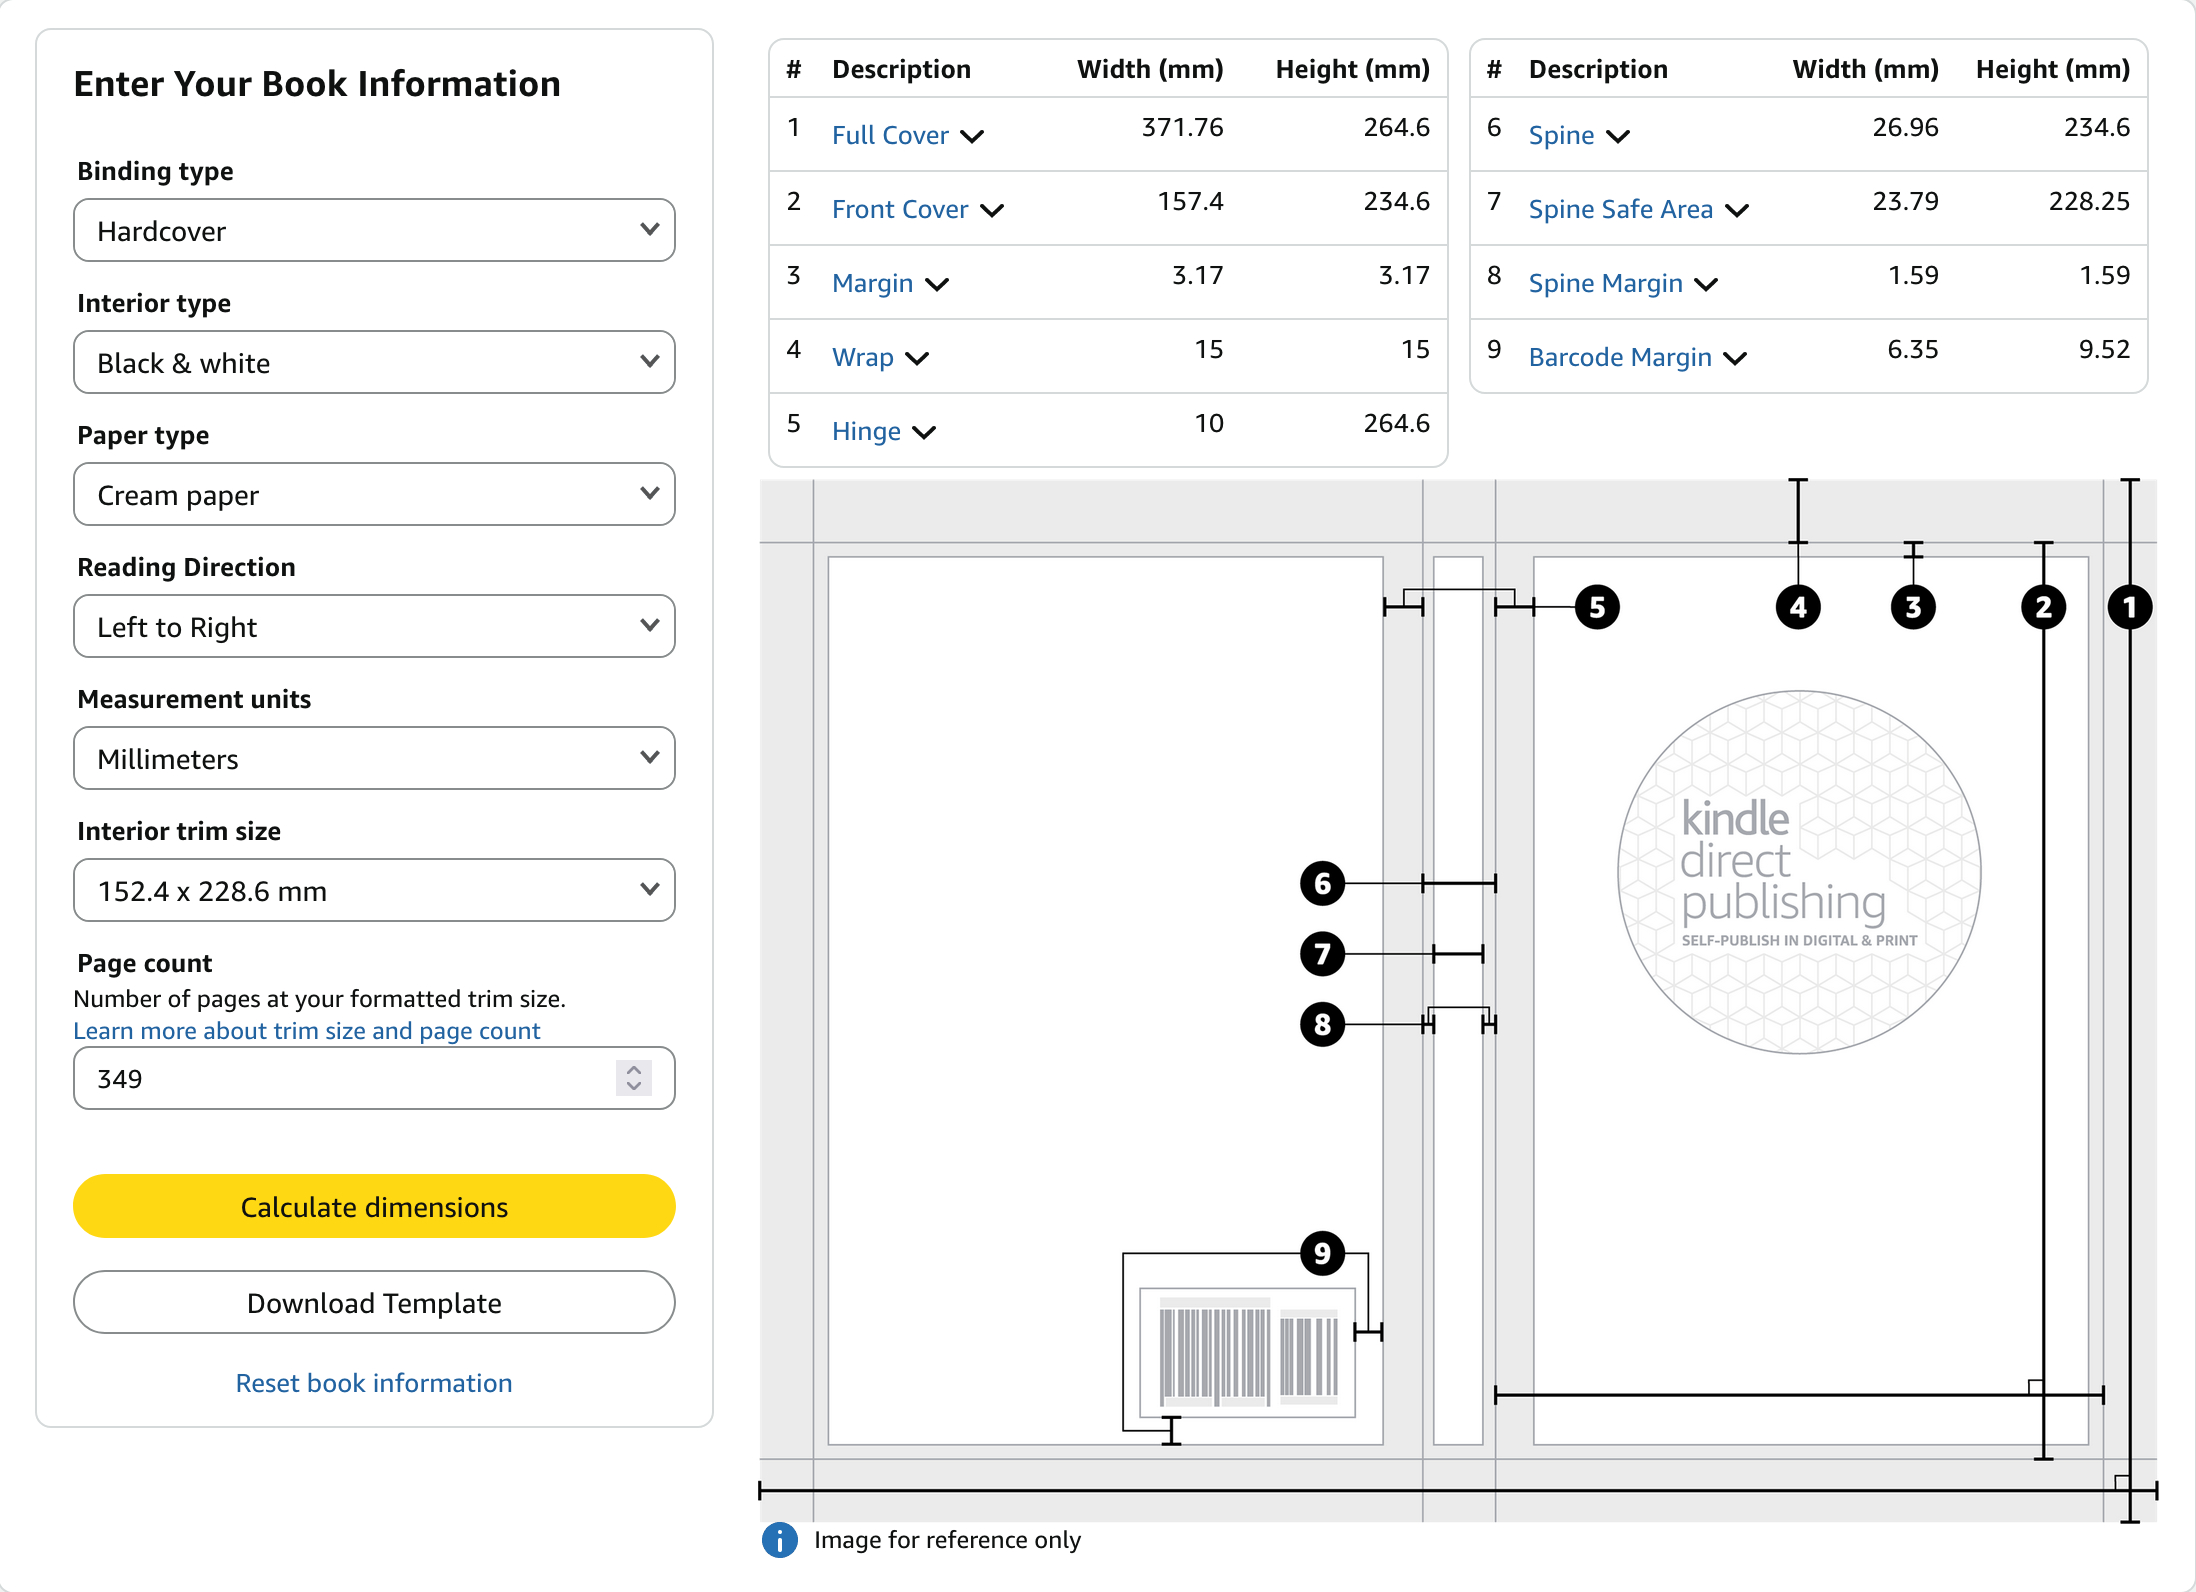
It used to be that every time I created a cover for publishing a paperback or hardcover book at Amazon, I had to do numerous calculations to figure out where to put various content on the cover image.
When the number of pages changes, the thickness of the book changes. When the thickness changes, the size of the wrap-around cover image also changes.
Here is the cover image of the hardcover book the above calculator screenshot was for. (One of my pen names is Vern Harrison.)
.png)
You see there are three panels with content. The left side of the image contains the panel for the back cover. The narrow, tall panel in the center is for the spine of the book. The panel at the right side of the image is for the front cover. (I almost always place the cover image under the panels.)
To find the specific locations for each panel is where I used to do manual calculations.
Now, I use my own software for calculating the position of the panels. I fire up the software and give it the numbers that the Amazon calculator gave to me.
This is a screenshot of the page where the Amazon calculator numbers are plugged in.
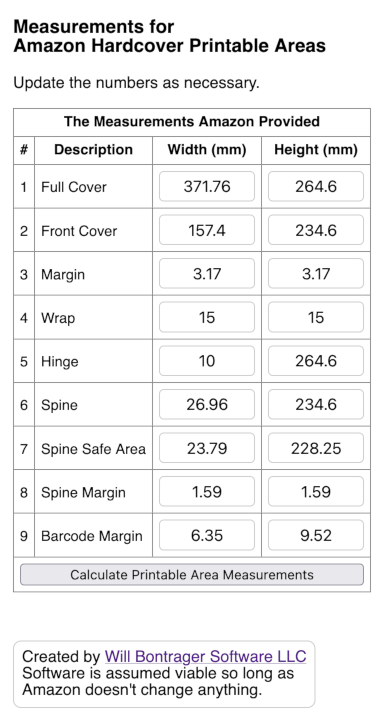
Then tap that "Calculate…" button. In less than a breath, I have the numbers I need.
Here is a screenshot with the result of using the above numbers.
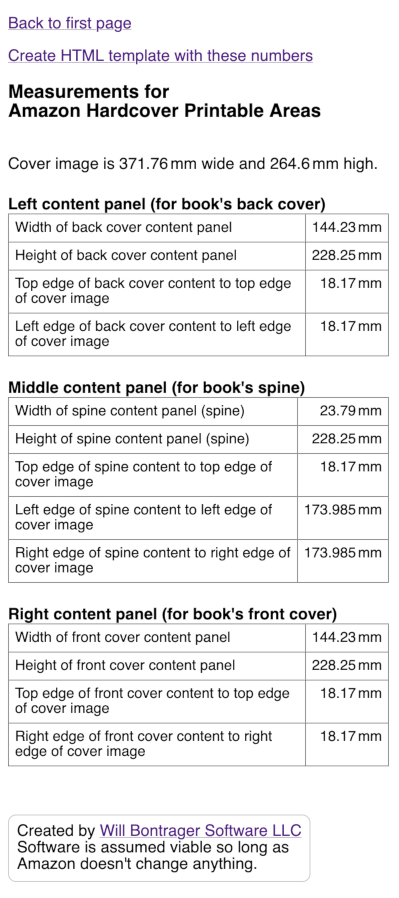
If you use image software to create covers, then the above may be all you need for sizing and positioning.
I use HTML and CSS to create covers. The "Create HTML template with these numbers" link you see near the top of the last screenshot is for me. And for you if you wish to use HTML and CSS.
When that link is used, you get a template something like this (the paperback template looks a bit different):
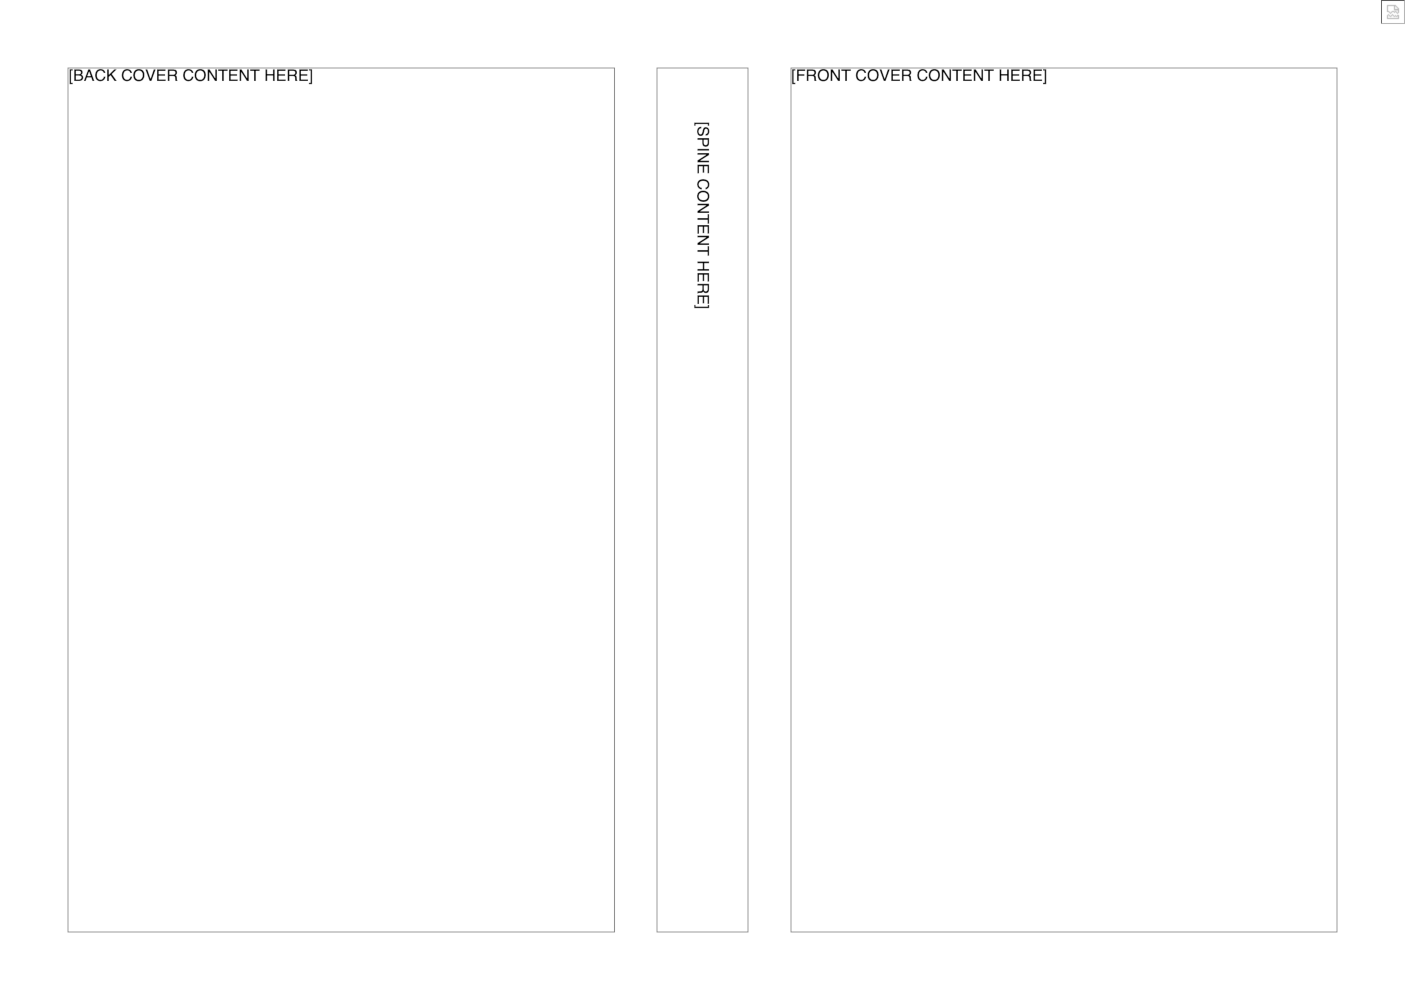
Save the template web page. Then use it to fill in your content. I find it simple. But then, I'm comfortable with HTML and CSS.
What I do is add an image to the template (the place is marked) and then add the content for each panel (also marked). When the result is what I want for the cover, I take a screenshot of it.
If you use Firefox, you may already have noticed the "Take Screenshot" menu item when right-clicking on most places of a web page. With Firefox, you have the option of screenshotting the entire page, even when not all of it is showing in the browser window. It's a really handy tool.
Amazon requires a ready-to-print PDF for printing hardcover and paperback book covers. With the screenshot at hand, you are now ready to create the PDF. Image-to-PDF instructions are outside the scope of this article. But you might use GIMP, Word, OpenOffice, or an online service to do the job (I generally use either GIMP or an online service).
The Source Code
There are two PHP scripts. One is for calculations related to hardcover book covers. The other is for calculations related to paperback books.
The scripts save the settings of the last time they were used. When the script loads, those settings are re-entered for you. You change what needs to be changed.
You may wish to change the file name where the settings are saved. It is an assignment to the $LastNumbersFileName variable on line 10 of the script. There are no other customizations.
Hardcover Books
This software may be used to determine content panel measurements for Amazon hardcover books.
<?php /*
Measurements for Amazon Hardcover Printable Areas
Version 1.0
April 30, 2026
Will Bontrager Software LLC
https://www.willmaster.com/
*/
// All book cover measurements in this software are millimeters.
$LastNumbersFileName = 'MAHPA.json';
$Prefill = array(); // Defaults copied from specs for black & white, cream paper, 152.4x228.6mm(6x9"), 349 pages.
$Prefill['fullcover']['w'] = 371.76;
$Prefill['fullcover']['h'] = 264.6;
$Prefill['frontcover']['w'] = 157.4;
$Prefill['frontcover']['h'] = 234.6;
$Prefill['margin']['w'] = 3.17;
$Prefill['margin']['h'] = 3.17;
$Prefill['wrap']['w'] = 15;
$Prefill['wrap']['h'] = 15;
$Prefill['hinge']['w'] = 10;
$Prefill['hinge']['h'] = 264.6;
$Prefill['spine']['w'] = 26.96;
$Prefill['spine']['h'] = 234.6;
$Prefill['spinesafearea']['w'] = 23.79;
$Prefill['spinesafearea']['h'] = 228.25;
$Prefill['spinemargin']['w'] = 1.59;
$Prefill['spinemargin']['h'] = 1.59;
$Prefill['barcodemargin']['w'] = 6.35;
$Prefill['barcodemargin']['h'] = 9.52;
$defaultPrefill = $Prefill;
if( isset($_GET['fullSizeWidth']) ) { PresentTemplate(); }
elseif( isset($_POST['fullcover_w']) ) { PresentMeasurements(); }
else { PresentForm(); }
function PresentTemplate()
{
$fullSizeWidth = $_GET['fullSizeWidth'];
$fullSizeHeight = $_GET['fullSizeHeight'];
$topContentToEdge = $_GET['topContentToEdge'];
$leftrightContentToEdge = $topContentToEdge;
$contentPanelHeight = $_GET['contentPanelHeight'];
$leftrightPanelWidth = $_GET['leftrightPanelWidth'];
$middlePanelWidth = $_GET['middlePanelWidth'];
$middleContentToEdge = $_GET['middleContentToEdge'];
echo <<<PAGE
<!DOCTYPE html>
<html lang="en">
<head>
<meta charset="utf-8">
<meta http-equiv="Content-Type" content="text/html;charset=UTF-8">
<meta name="viewport" content="width=device-width, initial-scale=1.0">
<title>Template for Amazon Paperback Printable Areas</title>
<style type="text/css">
@charset "utf-8";
* { box-sizing:border-box; }
html,body { font-family:sans-serif; font-size:100%; margin:0;
width:{$fullSizeWidth}mm; height:{$fullSizeHeight}mm; margin:0; color:black; background-color:black; }
</style>
</head>
<body><div style="overflow:hidden; width:{$fullSizeWidth}mm; height:{$fullSizeHeight}mm; background-color:white; position:relative;">
\r\n\r\n\r\n<!-- It is expected that you have sufficient HTML and CSS skills to create the cover you want with this rudamentary template. -->
\r\n\r\n\r\n<!-- Optional cover image (placed before content that will be on top of the image -->
<div style="position:absolute; right:0; top:0; width:____;">
<img src="my_image.jpg" style="width:100%;">
</div>
<!-- end of optional cover image -->
\r\n\r\n\r\n<!-- Left panel (for book's back cover) -->
<!-- IMPORTANT: Make outline color transparent (or remove) before publishing. -->
<div style="outline:1px solid gray; position:absolute; top:{$topContentToEdge}mm; left:{$leftrightContentToEdge}mm; width:{$leftrightPanelWidth}mm; height:{$contentPanelHeight}mm;">
[BACK COVER CONTENT HERE]
</div>
<!-- end of left panel (for book's back cover) -->
\r\n\r\n\r\n<!-- Center panel (for book's spine) -->
<!-- IMPORTANT: Make outline color transparent (or remove) before publishing. -->
<div style="outline:1px solid gray; position:absolute; top:{$topContentToEdge}mm; left:{$middleContentToEdge}mm; width:{$middlePanelWidth}mm; height:{$contentPanelHeight}mm;">
<div style="transform:rotate(90deg); white-space:nowrap; padding-left:{$middlePanelWidth}mm;">[SPINE CONTENT HERE]</div>
</div>
<!-- end of center panel (for book's spine) -->
\r\n\r\n\r\n<!-- Right panel (for book's front cover) -->
<!-- IMPORTANT: Make outline color transparent (or remove) before publishing. -->
<div style="outline:1px solid gray; position:absolute; top:{$topContentToEdge}mm; right:{$leftrightContentToEdge}mm; width:{$leftrightPanelWidth}mm; height:{$contentPanelHeight}mm;">
[FRONT COVER CONTENT HERE]
</div>
<!-- end of right Panel (for book's front cover) -->
\r\n\r\n</div>
</body>
</html>
PAGE;
} # PresentTemplate()
function PresentMeasurements()
{
global $LastNumbersFileName, $Prefill;
// Save the measurements for loading next time.
$Prefill['fullcover']['w'] = $_POST['fullcover_w'];
$Prefill['fullcover']['h'] = $_POST['fullcover_h'];
$Prefill['frontcover']['w'] = $_POST['frontcover_w'];
$Prefill['frontcover']['h'] = $_POST['frontcover_h'];
$Prefill['margin']['w'] = $_POST['margin_w'];
$Prefill['margin']['h'] = $_POST['margin_h'];
$Prefill['wrap']['w'] = $_POST['wrap_w'];
$Prefill['wrap']['h'] = $_POST['wrap_h'];
$Prefill['hinge']['w'] = $_POST['hinge_w'];
$Prefill['hinge']['h'] = $_POST['hinge_h'];
$Prefill['spine']['w'] = $_POST['spine_w'];
$Prefill['spine']['h'] = $_POST['spine_h'];
$Prefill['spinesafearea']['w'] = $_POST['spinesafearea_w'];
$Prefill['spinesafearea']['h'] = $_POST['spinesafearea_h'];
$Prefill['spinemargin']['w'] = $_POST['spinemargin_w'];
$Prefill['spinemargin']['h'] = $_POST['spinemargin_h'];
$Prefill['barcodemargin']['w'] = $_POST['barcodemargin_w'];
$Prefill['barcodemargin']['h'] = $_POST['barcodemargin_h'];
file_put_contents(__DIR__."/$LastNumbersFileName",json_encode($Prefill));
// Do the calculations.
$fullSizeWidth = $Prefill['fullcover']['w'];
$fullSizeHeight = $Prefill['fullcover']['h'];
$topContentToEdge = $Prefill['wrap']['h'] + $Prefill['margin']['h'];
$leftrightContentToEdge = $topContentToEdge;
$contentPanelHeight = $Prefill['spinesafearea']['h'];
$leftrightPanelWidth = $Prefill['frontcover']['w'] - $Prefill['hinge']['w'] - $Prefill['margin']['w'];
$middlePanelWidth = $Prefill['spinesafearea']['w'];
$f = $Prefill['fullcover']['w']-$Prefill['spinesafearea']['w'];
$middleContentToEdge = $f/2;
$Prefill['calc']['LeftPanelWidth'] = $leftrightPanelWidth;
$Prefill['calc']['LeftPanelHeight'] = $contentPanelHeight;
$Prefill['calc']['LeftPanelTopToEdge'] = $topContentToEdge;
$Prefill['calc']['LeftPanelLeftToEdge'] = $leftrightContentToEdge;
$Prefill['calc']['MiddlePanelWidth'] = $middlePanelWidth;
$Prefill['calc']['MiddlePanelHeight'] = $contentPanelHeight;
$Prefill['calc']['MiddlePanelTopToEdge'] = $topContentToEdge;
$Prefill['calc']['MiddlePanelLeftToEdge'] = $middleContentToEdge;
$Prefill['calc']['MiddlePanelRightToEdge'] = $middleContentToEdge;
$Prefill['calc']['RightPanelWidth'] = $leftrightPanelWidth;
$Prefill['calc']['RightPanelHeight'] = $contentPanelHeight;
$Prefill['calc']['RightPanelTopToEdge'] = $topContentToEdge;
$Prefill['calc']['RightPanelRightToEdge'] = $leftrightContentToEdge;
// Present the numbers.
echo <<<PAGETOP
<!DOCTYPE html>
<html lang="en">
<head>
<meta http-equiv="Content-Type" content="text/html;charset=UTF-8">
<meta name="viewport" content="width=device-width, initial-scale=1.0">
<title>Measurements for Amazon Hardcover Printable Areas</title>
<style type="text/css">
@charset "utf-8";
* { box-sizing:border-box; }
body { font-family:sans-serif; font-size:100%; }
tr { font-size:90%; font-weight:bold; vertical-align:bottom; }
td { font-size:100%; font-weight:normal; vertical-align:center; }
input[type="text"] { width:6em; font-size:1rem; border:1px solid #ccc; padding:.3rem; border-radius:.3rem; text-align:center; }
</style>
</head>
<body>
<p><a href="{$_SERVER['PHP_SELF']}">Back to first page</a></p>
<p><a href="{$_SERVER['PHP_SELF']}?fullSizeWidth=$fullSizeWidth&fullSizeHeight=$fullSizeHeight&topContentToEdge=$topContentToEdge&leftrightContentToEdge=$leftrightContentToEdge&contentPanelHeight=$contentPanelHeight&leftrightPanelWidth=$leftrightPanelWidth&middlePanelWidth=$middlePanelWidth&middleContentToEdge=$middleContentToEdge">Create HTML template with these numbers</a></p>
<h3>Measurements for<br>Amazon Hardcover Printable Areas</h3>
<p style="position:relative; bottom:-1em;">
Cover image is {$Prefill['fullcover']['w']} mm wide and {$Prefill['fullcover']['h']} mm high.
</p>
<div style="display:inline-block; margin-right:2rem; margin-top:1.5rem; vertical-align:top;">
<div><b>Left content panel (for book's back cover)</b></div>
<table border="1" cellspacing="0" cellpadding="6" style="border-collapse:collapse; empty-cells:show;">
<tr><td>Width of back cover content panel</td><td style="text-align:right; white-space:nowrap;">{$Prefill['calc']['LeftPanelWidth']} mm</td></tr>
<tr><td>Height of back cover content panel</td><td style="text-align:right; white-space:nowrap;">{$Prefill['calc']['LeftPanelHeight']} mm</td></tr>
<tr><td>Top edge of back cover content to top edge of cover image</td><td style="text-align:right; white-space:nowrap;">{$Prefill['calc']['LeftPanelTopToEdge']} mm</td></tr>
<tr><td>Left edge of back cover content to left edge of cover image</td><td style="text-align:right; white-space:nowrap;">{$Prefill['calc']['LeftPanelLeftToEdge']} mm</td></tr>
</table>
</div>
<div style="display:inline-block; margin-right:2rem; margin-top:1.5rem; vertical-align:top;">
<div><b>Middle content panel (for book's spine)</b></div>
<table border="1" cellspacing="0" cellpadding="6" style="border-collapse:collapse; empty-cells:show;">
<tr><td>Width of spine content panel (spine)</td><td style="text-align:right; white-space:nowrap;">{$Prefill['calc']['MiddlePanelWidth']} mm</td></tr>
<tr><td>Height of spine content panel (spine)</td><td style="text-align:right; white-space:nowrap;">{$Prefill['calc']['MiddlePanelHeight']} mm</td></tr>
<tr><td>Top edge of spine content to top edge of cover image</td><td style="text-align:right; white-space:nowrap;">{$Prefill['calc']['LeftPanelTopToEdge']} mm</td></tr>
<tr><td>Left edge of spine content to left edge of cover image</td><td style="text-align:right; white-space:nowrap;">{$Prefill['calc']['MiddlePanelLeftToEdge']} mm</td></tr>
<tr><td>Right edge of spine content to right edge of cover image</td><td style="text-align:right; white-space:nowrap;">{$Prefill['calc']['MiddlePanelRightToEdge']} mm</td></tr>
</table>
</div>
<div style="display:inline-block; margin-right:2rem; margin-top:1.5rem; vertical-align:top;">
<div><b>Right content panel (for book's front cover)</b></div>
<table border="1" cellspacing="0" cellpadding="6" style="border-collapse:collapse; empty-cells:show;">
<tr><td>Width of front cover content panel</td><td style="text-align:right; white-space:nowrap;">{$Prefill['calc']['RightPanelWidth']} mm</td></tr>
<tr><td>Height of front cover content panel</td><td style="text-align:right; white-space:nowrap;">{$Prefill['calc']['RightPanelHeight']} mm</td></tr>
<tr><td>Top edge of front cover content to top edge of cover image</td><td style="text-align:right; white-space:nowrap;">{$Prefill['calc']['RightPanelTopToEdge']} mm</td></tr>
<tr><td>Right edge of front cover content to right edge of cover image</td><td style="text-align:right; white-space:nowrap;">{$Prefill['calc']['RightPanelRightToEdge']} mm</td></tr>
</table>
</div>
PAGETOP;
PresentPageBottom();
} # function PresentMeasurements()
function PresentForm()
{
global $LastNumbersFileName, $Prefill;
if( file_exists(__DIR__."/$LastNumbersFileName") ) { $Prefill = json_decode(trim(file_get_contents(__DIR__."/$LastNumbersFileName")),true); }
echo <<<PAGETOP
<!DOCTYPE html>
<html lang="en">
<head>
<meta http-equiv="Content-Type" content="text/html;charset=UTF-8">
<meta name="viewport" content="width=device-width, initial-scale=1.0">
<title>Measurements for Amazon Hardcover Printable Areas</title>
<style type="text/css">
@charset "utf-8";
* { box-sizing:border-box; }
body { font-family:sans-serif; font-size:100%; }
tr { font-size:90%; font-weight:bold; vertical-align:bottom; }
td { font-size:100%; font-weight:normal; vertical-align:center; }
input[type="text"] { width:6em; font-size:1rem; border:1px solid #ccc; padding:.3rem; border-radius:.3rem; text-align:center; }
</style>
</head>
<body>
<form id="my-form" enctype="multipart/form-data" action="{$_SERVER['PHP_SELF']}" method="post" accept-charset="utf-8">
<div style="width:fit-content; margin:0 auto;">
<h3>Measurements for<br>Amazon Hardcover Printable Areas</h3>
<p>Update the numbers as necessary.</p>
<table border="1" cellspacing="0" cellpadding="6" style="border-collapse:collapse; empty-cells:show;">
<tr>
<th colspan="4">The Measurements Amazon Provided</th>
</tr>
<tr>
<th>#</th><th>Description</th><th>Width (mm)</th><th>Height (mm)</th>
</tr>
<tr>
<td>1</td>
<td>Full Cover</td>
<td><input name="fullcover_w" type="text" onfocus="select()" value="{$Prefill['fullcover']['w']}"></td>
<td><input name="fullcover_h" type="text" onfocus="select()" value="{$Prefill['fullcover']['h']}"></td>
</tr>
<tr>
<td>2</td>
<td>Front Cover</td>
<td><input name="frontcover_w" type="text" onfocus="select()" value="{$Prefill['frontcover']['w']}"></td>
<td><input name="frontcover_h" type="text" onfocus="select()" value="{$Prefill['frontcover']['h']}"></td>
</tr>
<tr>
<td>3</td>
<td>Margin</td>
<td><input name="margin_w" type="text" onfocus="select()" value="{$Prefill['margin']['w']}"></td>
<td><input name="margin_h" type="text" onfocus="select()" value="{$Prefill['margin']['h']}"></td>
</tr>
<tr>
<td>4</td>
<td>Wrap</td>
<td><input name="wrap_w" type="text" onfocus="select()" value="{$Prefill['wrap']['w']}"></td>
<td><input name="wrap_h" type="text" onfocus="select()" value="{$Prefill['wrap']['h']}"></td>
</tr>
<tr>
<td>5</td>
<td>Hinge</td>
<td><input name="hinge_w" type="text" onfocus="select()" value="{$Prefill['hinge']['w']}"></td>
<td><input name="hinge_h" type="text" onfocus="select()" value="{$Prefill['hinge']['h']}"></td>
</tr>
<tr>
<td>6</td>
<td>Spine</td>
<td><input name="spine_w" type="text" onfocus="select()" value="{$Prefill['spine']['w']}"></td>
<td><input name="spine_h" type="text" onfocus="select()" value="{$Prefill['spine']['h']}"></td>
</tr>
<tr>
<td>7</td>
<td>Spine Safe Area</td>
<td><input name="spinesafearea_w" type="text" onfocus="select()" value="{$Prefill['spinesafearea']['w']}"></td>
<td><input name="spinesafearea_h" type="text" onfocus="select()" value="{$Prefill['spinesafearea']['h']}"></td>
</tr>
<tr>
<td>8</td>
<td>Spine Margin</td>
<td><input name="spinemargin_w" type="text" onfocus="select()" value="{$Prefill['spinemargin']['w']}"></td>
<td><input name="spinemargin_h" type="text" onfocus="select()" value="{$Prefill['spinemargin']['h']}"></td>
</tr>
<tr>
<td>9</td>
<td>Barcode Margin</td>
<td><input name="barcodemargin_w" type="text" onfocus="select()" value="{$Prefill['barcodemargin']['w']}"></td>
<td><input name="barcodemargin_h" type="text" onfocus="select()" value="{$Prefill['barcodemargin']['h']}"></td>
</tr>
<tr>
<td colspan="4"><input type="submit" value="Calculate Printable Area Measurements" style="width:100%;"></td>
</tr>
</table>
PAGETOP;
PresentPageBottom();
} # function PresentForm()
function PresentPageBottom()
{
echo <<<PAGEBOTTOM
<p style="margin-top:3em; border:1px solid #ccc; padding:.5em; border-radius:.5em; width:fit-content;">
Created by <a href="">Will Bontrager Software LLC</a>
<br>Software is assumed viable so long as <br>Amazon doesn't change anything.
</p>
</div>
</body>
</html>
PAGEBOTTOM;
} # function PresentForm()
exit;
?>
Paperback Books
This software may be used to determine content panel measurements for Amazon paperback books.
<?php /*
Measurements for Amazon Paperback Printable Areas
Version 1.0
April 30, 2026
Will Bontrager Software LLC
https://www.willmaster.com/
*/
// All book cover measurements in this software are millimeters.
$LastNumbersFileName = 'MAPPA.json';
$Prefill = array(); // Defaults copied from specs for black & white, cream paper, 152.4x228.6mm(6x9"), 315 pages.
$Prefill['fullcover']['w'] = 331.15;
$Prefill['fullcover']['h'] = 234.95;
$Prefill['frontcover']['w'] = 152.4;
$Prefill['frontcover']['h'] = 228.6;
$Prefill['safearea']['w'] = 149.23;
$Prefill['safearea']['h'] = 222.25;
$Prefill['bleed']['w'] = 3.17;
$Prefill['bleed']['h'] = 3.17;
$Prefill['margin']['w'] = 3.17;
$Prefill['margin']['h'] = 3.17;
$Prefill['spine']['w'] = 20;
$Prefill['spine']['h'] = 228.6;
$Prefill['spinesafearea']['w'] = 16.83;
$Prefill['spinesafearea']['h'] = 222.25;
$Prefill['spinemargin']['w'] = 1.59;
$Prefill['spinemargin']['h'] = 1.59;
$Prefill['barcodemargin']['w'] = 6.35;
$Prefill['barcodemargin']['h'] = 6.35;
$defaultPrefill = $Prefill;
if( isset($_GET['fullSizeWidth']) ) { PresentTemplate(); }
elseif( isset($_POST['fullcover_w']) ) { PresentMeasurements(); }
else { PresentForm(); }
function PresentTemplate()
{
$fullSizeWidth = $_GET['fullSizeWidth'];
$fullSizeHeight = $_GET['fullSizeHeight'];
$topContentToEdge = $_GET['topContentToEdge'];
$leftrightContentToEdge = $topContentToEdge;
$contentPanelHeight = $_GET['contentPanelHeight'];
$leftrightPanelWidth = $_GET['leftrightPanelWidth'];
$middlePanelWidth = $_GET['middlePanelWidth'];
$middleContentToEdge = $_GET['middleContentToEdge'];
echo <<<PAGE
<!DOCTYPE html>
<html lang="en">
<head>
<meta charset="utf-8">
<meta http-equiv="Content-Type" content="text/html;charset=UTF-8">
<meta name="viewport" content="width=device-width, initial-scale=1.0">
<title>Template for Amazon Paperback Printable Areas</title>
<style type="text/css">
@charset "utf-8";
* { box-sizing:border-box; }
html,body { font-family:sans-serif; font-size:100%; margin:0;
width:{$fullSizeWidth}mm; height:{$fullSizeHeight}mm; margin:0; color:black; background-color:black; }
</style>
</head>
<body><div style="overflow:hidden; width:{$fullSizeWidth}mm; height:{$fullSizeHeight}mm; background-color:white; position:relative;">
\r\n\r\n\r\n<!-- It is expected that you have sufficient HTML and CSS skills to create the cover you want with this rudamentary template. -->
\r\n\r\n\r\n<!-- Optional cover image (placed before content that will be on top of the image -->
<div style="position:absolute; right:0; top:0; width:____;">
<img src="my_image.jpg" style="width:100%;">
</div>
<!-- end of optional cover image -->
\r\n\r\n\r\n<!-- Left panel (for book's back cover) -->
<!-- IMPORTANT: Make outline color transparent (or remove) before publishing. -->
<div style="outline:1px solid gray; position:absolute; top:{$topContentToEdge}mm; left:{$leftrightContentToEdge}mm; width:{$leftrightPanelWidth}mm; height:{$contentPanelHeight}mm;">
[BACK COVER CONTENT HERE]
</div>
<!-- end of left panel (for book's back cover) -->
\r\n\r\n\r\n<!-- Center panel (for book's spine) -->
<!-- IMPORTANT: Make outline color transparent (or remove) before publishing. -->
<div style="outline:1px solid gray; position:absolute; top:{$topContentToEdge}mm; left:{$middleContentToEdge}mm; width:{$middlePanelWidth}mm; height:{$contentPanelHeight}mm;">
<div style="transform:rotate(90deg); white-space:nowrap; padding-left:{$middlePanelWidth}mm;">[SPINE CONTENT HERE]</div>
</div>
<!-- end of center panel (for book's spine) -->
\r\n\r\n\r\n<!-- Right panel (for book's front cover) -->
<!-- IMPORTANT: Make outline color transparent (or remove) before publishing. -->
<div style="outline:1px solid gray; position:absolute; top:{$topContentToEdge}mm; right:{$leftrightContentToEdge}mm; width:{$leftrightPanelWidth}mm; height:{$contentPanelHeight}mm;">
[FRONT COVER CONTENT HERE]
</div>
<!-- end of right Panel (for book's front cover) -->
\r\n\r\n</div>
</body>
</html>
PAGE;
} # PresentTemplate()
function PresentMeasurements()
{
global $LastNumbersFileName, $Prefill;
// Save the measurements for loading next time.
$Prefill['fullcover']['w'] = $_POST['fullcover_w'];
$Prefill['fullcover']['h'] = $_POST['fullcover_h'];
$Prefill['frontcover']['w'] = $_POST['frontcover_w'];
$Prefill['frontcover']['h'] = $_POST['frontcover_h'];
$Prefill['safearea']['w'] = $_POST['safearea_w'];
$Prefill['safearea']['h'] = $_POST['safearea_h'];
$Prefill['bleed']['w'] = $_POST['bleed_w'];
$Prefill['bleed']['h'] = $_POST['bleed_h'];
$Prefill['margin']['w'] = $_POST['margin_w'];
$Prefill['margin']['h'] = $_POST['margin_h'];
$Prefill['spine']['w'] = $_POST['spine_w'];
$Prefill['spine']['h'] = $_POST['spine_h'];
$Prefill['spinesafearea']['w'] = $_POST['spinesafearea_w'];
$Prefill['spinesafearea']['h'] = $_POST['spinesafearea_h'];
$Prefill['spinemargin']['w'] = $_POST['spinemargin_w'];
$Prefill['spinemargin']['h'] = $_POST['spinemargin_h'];
$Prefill['barcodemargin']['w'] = $_POST['barcodemargin_w'];
$Prefill['barcodemargin']['h'] = $_POST['barcodemargin_h'];
file_put_contents(__DIR__."/$LastNumbersFileName",json_encode($Prefill));
// Do the calculations.
$fullSizeWidth = $Prefill['fullcover']['w'];
$fullSizeHeight = $Prefill['fullcover']['h'];
$topContentToEdge = $Prefill['bleed']['h'] + $Prefill['margin']['h'];
$leftrightContentToEdge = $topContentToEdge;
$contentPanelHeight = $Prefill['safearea']['h'];
$leftrightPanelWidth = $Prefill['safearea']['w'];
$middlePanelWidth = $Prefill['spinesafearea']['w'];
$f = $Prefill['fullcover']['w']-$Prefill['spinesafearea']['w'];
$middleContentToEdge = $f/2;
$Prefill['calc']['LeftPanelWidth'] = $leftrightPanelWidth;
$Prefill['calc']['LeftPanelHeight'] = $contentPanelHeight;
$Prefill['calc']['LeftPanelTopToEdge'] = $topContentToEdge;
$Prefill['calc']['LeftPanelLeftToEdge'] = $leftrightContentToEdge;
$Prefill['calc']['MiddlePanelWidth'] = $middlePanelWidth;
$Prefill['calc']['MiddlePanelHeight'] = $contentPanelHeight;
$Prefill['calc']['MiddlePanelTopToEdge'] = $topContentToEdge;
$Prefill['calc']['MiddlePanelLeftToEdge'] = $middleContentToEdge;
$Prefill['calc']['MiddlePanelRightToEdge'] = $middleContentToEdge;
$Prefill['calc']['RightPanelWidth'] = $leftrightPanelWidth;
$Prefill['calc']['RightPanelHeight'] = $contentPanelHeight;
$Prefill['calc']['RightPanelTopToEdge'] = $topContentToEdge;
$Prefill['calc']['RightPanelRightToEdge'] = $leftrightContentToEdge;
// Present the numbers.
echo <<<PAGETOP
<!DOCTYPE html>
<html lang="en">
<head>
<meta http-equiv="Content-Type" content="text/html;charset=UTF-8">
<meta name="viewport" content="width=device-width, initial-scale=1.0">
<title>Measurements for Amazon Paperback Printable Areas</title>
<style type="text/css">
@charset "utf-8";
* { box-sizing:border-box; }
body { font-family:sans-serif; font-size:100%; }
tr { font-size:90%; font-weight:bold; vertical-align:bottom; }
td { font-size:100%; font-weight:normal; vertical-align:center; }
input[type="text"] { width:6em; font-size:1rem; border:1px solid #ccc; padding:.3rem; border-radius:.3rem; text-align:center; }
</style>
</head>
<body>
<p><a href="{$_SERVER['PHP_SELF']}">Back to first page</a></p>
<p><a href="{$_SERVER['PHP_SELF']}?fullSizeWidth=$fullSizeWidth&fullSizeHeight=$fullSizeHeight&topContentToEdge=$topContentToEdge&leftrightContentToEdge=$leftrightContentToEdge&contentPanelHeight=$contentPanelHeight&leftrightPanelWidth=$leftrightPanelWidth&middlePanelWidth=$middlePanelWidth&middleContentToEdge=$middleContentToEdge">Create HTML template with these numbers</a></p>
<h3>Measurements for<br>Amazon Paperback Printable Areas</h3>
<p style="position:relative; bottom:-1em;">
Cover image is {$Prefill['fullcover']['w']} mm wide and {$Prefill['fullcover']['h']} mm high.
</p>
<div style="display:inline-block; margin-right:2rem; margin-top:1.5rem; vertical-align:top;">
<div><b>Left content panel (for book's back cover)</b></div>
<table border="1" cellspacing="0" cellpadding="6" style="border-collapse:collapse; empty-cells:show;">
<tr><td>Width of back cover content panel</td><td style="text-align:right; white-space:nowrap;">{$Prefill['calc']['LeftPanelWidth']} mm</td></tr>
<tr><td>Height of back cover content panel</td><td style="text-align:right; white-space:nowrap;">{$Prefill['calc']['LeftPanelHeight']} mm</td></tr>
<tr><td>Top edge of back cover content to top edge of cover image</td><td style="text-align:right; white-space:nowrap;">{$Prefill['calc']['LeftPanelTopToEdge']} mm</td></tr>
<tr><td>Left edge of back cover content to left edge of cover image</td><td style="text-align:right; white-space:nowrap;">{$Prefill['calc']['LeftPanelLeftToEdge']} mm</td></tr>
</table>
</div>
<div style="display:inline-block; margin-right:2rem; margin-top:1.5rem; vertical-align:top;">
<div><b>Middle content panel (for book's spine)</b></div>
<table border="1" cellspacing="0" cellpadding="6" style="border-collapse:collapse; empty-cells:show;">
<tr><td>Width of spine content panel (spine)</td><td style="text-align:right; white-space:nowrap;">{$Prefill['calc']['MiddlePanelWidth']} mm</td></tr>
<tr><td>Height of spine content panel (spine)</td><td style="text-align:right; white-space:nowrap;">{$Prefill['calc']['MiddlePanelHeight']} mm</td></tr>
<tr><td>Top edge of spine content to top edge of cover image</td><td style="text-align:right; white-space:nowrap;">{$Prefill['calc']['LeftPanelTopToEdge']} mm</td></tr>
<tr><td>Left edge of spine content to left edge of cover image</td><td style="text-align:right; white-space:nowrap;">{$Prefill['calc']['MiddlePanelLeftToEdge']} mm</td></tr>
<tr><td>Right edge of spine content to right edge of cover image</td><td style="text-align:right; white-space:nowrap;">{$Prefill['calc']['MiddlePanelRightToEdge']} mm</td></tr>
</table>
</div>
<div style="display:inline-block; margin-right:2rem; margin-top:1.5rem; vertical-align:top;">
<div><b>Right content panel (for book's front cover)</b></div>
<table border="1" cellspacing="0" cellpadding="6" style="border-collapse:collapse; empty-cells:show;">
<tr><td>Width of front cover content panel</td><td style="text-align:right; white-space:nowrap;">{$Prefill['calc']['RightPanelWidth']} mm</td></tr>
<tr><td>Height of front cover content panel</td><td style="text-align:right; white-space:nowrap;">{$Prefill['calc']['RightPanelHeight']} mm</td></tr>
<tr><td>Top edge of front cover content to top edge of cover image</td><td style="text-align:right; white-space:nowrap;">{$Prefill['calc']['RightPanelTopToEdge']} mm</td></tr>
<tr><td>Right edge of front cover content to right edge of cover image</td><td style="text-align:right; white-space:nowrap;">{$Prefill['calc']['RightPanelRightToEdge']} mm</td></tr>
</table>
</div>
PAGETOP;
PresentPageBottom();
} # function PresentMeasurements()
function PresentForm()
{
global $LastNumbersFileName, $Prefill;
if( file_exists(__DIR__."/$LastNumbersFileName") ) { $Prefill = json_decode(trim(file_get_contents(__DIR__."/$LastNumbersFileName")),true); }
echo <<<PAGETOP
<!DOCTYPE html>
<html lang="en">
<head>
<meta http-equiv="Content-Type" content="text/html;charset=UTF-8">
<meta name="viewport" content="width=device-width, initial-scale=1.0">
<title>Measurements for Amazon Paperback Printable Areas</title>
<style type="text/css">
@charset "utf-8";
* { box-sizing:border-box; }
body { font-family:sans-serif; font-size:100%; }
tr { font-size:90%; font-weight:bold; vertical-align:bottom; }
td { font-size:100%; font-weight:normal; vertical-align:center; }
input[type="text"] { width:6em; font-size:1rem; border:1px solid #ccc; padding:.3rem; border-radius:.3rem; text-align:center; }
</style>
</head>
<body>
<form id="my-form" enctype="multipart/form-data" action="{$_SERVER['PHP_SELF']}" method="post" accept-charset="utf-8">
<div style="width:fit-content; margin:0 auto;">
<h3>Measurements for<br>Amazon Paperback Printable Areas</h3>
<p>Update the numbers as necessary.</p>
<table border="1" cellspacing="0" cellpadding="6" style="border-collapse:collapse; empty-cells:show;">
<tr>
<th colspan="4">The Measurements Amazon Provided</th>
</tr>
<tr>
<th>#</th><th>Description</th><th>Width (mm)</th><th>Height (mm)</th>
</tr>
<tr>
<td>1</td>
<td>Full Cover</td>
<td><input name="fullcover_w" type="text" onfocus="select()" value="{$Prefill['fullcover']['w']}"></td>
<td><input name="fullcover_h" type="text" onfocus="select()" value="{$Prefill['fullcover']['h']}"></td>
</tr>
<tr>
<td>2</td>
<td>Front Cover</td>
<td><input name="frontcover_w" type="text" onfocus="select()" value="{$Prefill['frontcover']['w']}"></td>
<td><input name="frontcover_h" type="text" onfocus="select()" value="{$Prefill['frontcover']['h']}"></td>
</tr>
<tr>
<td>3</td>
<td>Safe Area</td>
<td><input name="safearea_w" type="text" onfocus="select()" value="{$Prefill['safearea']['w']}"></td>
<td><input name="safearea_h" type="text" onfocus="select()" value="{$Prefill['safearea']['h']}"></td>
</tr>
<tr>
<td>4</td>
<td>Bleed</td>
<td><input name="bleed_w" type="text" onfocus="select()" value="{$Prefill['bleed']['w']}"></td>
<td><input name="bleed_h" type="text" onfocus="select()" value="{$Prefill['bleed']['h']}"></td>
</tr>
<tr>
<td>5</td>
<td>Margin</td>
<td><input name="margin_w" type="text" onfocus="select()" value="{$Prefill['margin']['w']}"></td>
<td><input name="margin_h" type="text" onfocus="select()" value="{$Prefill['margin']['h']}"></td>
</tr>
<tr>
<td>6</td>
<td>Spine</td>
<td><input name="spine_w" type="text" onfocus="select()" value="{$Prefill['spine']['w']}"></td>
<td><input name="spine_h" type="text" onfocus="select()" value="{$Prefill['spine']['h']}"></td>
</tr>
<tr>
<td>7</td>
<td>Spine Safe Area</td>
<td><input name="spinesafearea_w" type="text" onfocus="select()" value="{$Prefill['spinesafearea']['w']}"></td>
<td><input name="spinesafearea_h" type="text" onfocus="select()" value="{$Prefill['spinesafearea']['h']}"></td>
</tr>
<tr>
<td>8</td>
<td>Spine Margin</td>
<td><input name="spinemargin_w" type="text" onfocus="select()" value="{$Prefill['spinemargin']['w']}"></td>
<td><input name="spinemargin_h" type="text" onfocus="select()" value="{$Prefill['spinemargin']['h']}"></td>
</tr>
<tr>
<td>9</td>
<td>Barcode Margin</td>
<td><input name="barcodemargin_w" type="text" onfocus="select()" value="{$Prefill['barcodemargin']['w']}"></td>
<td><input name="barcodemargin_h" type="text" onfocus="select()" value="{$Prefill['barcodemargin']['h']}"></td>
</tr>
<tr>
<td colspan="4"><input type="submit" value="Calculate Printable Area Measurements" style="width:100%;"></td>
</tr>
</table>
PAGETOP;
PresentPageBottom();
} # function PresentForm()
function PresentPageBottom()
{
echo <<<PAGEBOTTOM
<p style="margin-top:3em; border:1px solid #ccc; padding:.5em; border-radius:.5em; width:fit-content;">
Created by <a href="">Will Bontrager Software LLC</a>
<br>Software is assumed viable so long as <br>Amazon doesn't change anything.
</p>
</div>
</body>
</html>
PAGEBOTTOM;
} # function PresentForm()
exit;
?>
If you publish at Amazon, you may find the measurement calculators a nice tool. The measurement numbers may be consulted for use with pretty much any image software.
If you also use HTML and CSS to create your book covers, the HTML template feature is likely to be helpful.
(This content first appeared in Possibilities newsletter.)


