
Imprinting an Image
PHP can be used to overlay text on an image. The text becomes part of the image and can be saved to your hard-drive and used as any other image.
The PHP script provided with this article is the vehicle that will allow you (or your website visitors, if you make it publicly available) to apply custom text to an image. The PHP script is named Imprint Image.
The number of font choices is limited only by how many you make available. (Instructions with software download.)
The size of the image imprint text and the position of the text on the image can be specified. The text color, too.
It's all possible with the GD image processing module, enabled with most domains' PHP installations.
If you are unsure whether or not your PHP has GD image processing enabled, your hosting company can be asked or, if you prefer to find out on your own, do it this way:
-
Create a temporary page named testing.php that contains this one line:
<?php phpinfo(); ?>
-
Upload testing.php to your sever and type its URL into your browser. You'll get a page with a lot of information about your PHP installation.
-
On that page, find the section that appears similar to the image below. The arrows and ellipses indicate what parts of GD need to be enabled.
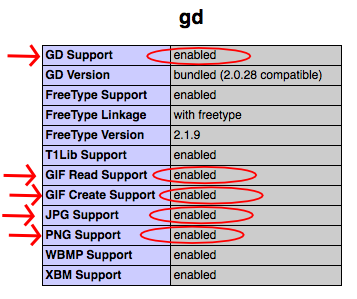
In the unlikely event GD is not enabled, ask your hosting company to enable GD with GIF, PNG, and JPG support for your PHP installation.
Give Imprint Image a run at the example installation.
If you like it, click here to download a copy.
Imprint Image Installation Instructions
The download package contains ImprintImage.php and 3 TrueType font files (.ttf). You'll need to provide a non-animated image (.gif, .png, .jpg, or .jpeg, any size) for the installation.
The download package also contains file readme.html with information about troubleshooting and how to add fonts and other customization notes.
Here are the installation steps.
-
Open file ImprintImage.php in a plain text processor. Find the Configuration section line starting with
$ImageFile =
and put the image file name between the quotation marks.If you wish, other variables in the Configuration section may be customized. And the form may be customized. However, all that is optional. See the readme.html page that came with the download package.
-
Create a new directory on your server.
-
Upload the PHP script, the 3 font files, and the image into the new directory.
-
In the new directory, create a subdirectory named "temp".
-
Type the URL of ImprintImage.php into your browser.
Imprint Image
The software download package includes troubleshooting, configuration, and customization notes. The notes include instructions for adding fonts and changing the list of available colors.
Imprint Image may be installed on your server for private or public use.
Will Bontrager


