
CSV to HTML Table
A project had a complicated CSV file that I needed to create a MySQL table for. To do that, the CSV file had to be read to determine the type of fields.
For help visualizing the CSV, I built a quick script to convert the CSV content into an HTML table.
There was similar software published in the Willmaster Library. But this one is better. So the old one now redirects to this newer article.
The CSV content can be provided to the CSV to HTML Table software in any one of a number of ways:
- Uploaded.
- An https:// URL.
- A specified server location.
- Content pasted into the dashboard.
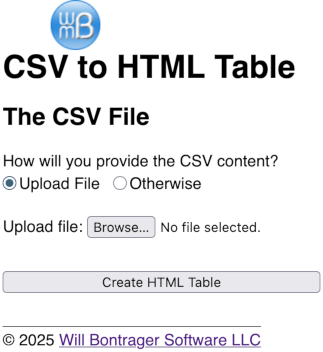
Here is a screenshot of how the software loads into your browser. (How it looks will depend on your browser. Every browser has their own default form field styles.)
Whichever method you decide to use for giving the software access to the CSV file, when you tap the "Create HTML Table" button, an HTML table is generated.
Let's suppose this is your CSV file.
one,two,three,"and here is the ""real"" thing",rain
44,"fourty, four",fourty-four,"the
back
fourty",sunshine
With the above, this HTML table would be generated.
| one | two | three | and here is the "real" thing | rain |
| 44 | fourty, four | fourty-four | the back fourty | sunshine |
Below is the source code of the CSV to HTML Table software. No customization is required.
<!DOCTYPE html>
<html lang="en">
<head>
<meta http-equiv="Content-Type" content="text/html;charset=UTF-8">
<meta name="viewport" content="width=device-width, initial-scale=1.0">
<title>CSV to HTML Table</title>
<style type="text/css">
@charset "utf-8";
html, body { font-family:sans-serif; font-size:100%; }
p { line-height:140%; }
.nowrap { white-space:nowrap; }
input[type='radio'] { margin:0; }
</style>
</head>
</head>
<body><div style="width:fit-content; margin:.55in auto; position:relative;">
<h1>CSV to HTML Table</h1>
<div style="position:absolute; left:.5in; top:-.55in;"><a href="https://www.willmaster.com/"><img src="https://www.willmaster.com/images/wmlogo_icon.gif" style="max-width:100%;" alt="logo"></a></div>
<?php if(isset($_POST['csvcontent'])): ?>
<h2>The HTML Table</h2>
<table border="1" cellpadding="6" cellspacing="0" style="border:1px solid black; border-collapse:collapse; empty-cells:show; margin-bottom:3em;">
<?php
$empty = false;
$uploaded = false;
if(isset($_FILES['csvupload']['tmp_name']) and strlen($_FILES['csvupload']['tmp_name'])>4)
{
if( $_FILES['csvupload']['size']>0 and $_FILES['csvupload']['error']==0 )
{
$uploaded = true;
$f = fopen($_FILES['csvupload']['tmp_name'],'r');
while( ($line=fgetcsv($f))!==false ) { echo '<tr><td>'.implode('</td><td>',$line)."</td></tr>\n"; }
fclose($f);
}
else { $empty = true; }
}
if( ! $uploaded )
{
$_POST['csvcontent']=trim($_POST['csvcontent']);
$empty = strlen($_POST['csvcontent']) ? false : true;
$is1line = substr_count($_POST['csvcontent'],"\n")<1 ? true : false;
if( $is1line )
{
if( preg_match('!^https?\://!i',$_POST['csvcontent']) )
{
$_POST['csvcontent'] = file_get_contents($_POST['csvcontent']);
$is1line = false;
}
elseif( ! preg_match('!^/!',$_POST['csvcontent']) ) { $is1line = false; }
else
{
$f = fopen("{$_SERVER['DOCUMENT_ROOT']}{$_POST['csvcontent']}",'r');
while( ($line=fgetcsv($f))!==false ) { echo '<tr><td>'.implode('</td><td>',$line)."</td></tr>\n"; }
fclose($f);
}
}
if( ! $is1line ) // Not using str_getcsv() because some CSV "lines" may span several lines.
{
$ff = __DIR__.'/_temp_'.mt_rand(1000000,9999999).'_.csv';
file_put_contents($ff,$_POST['csvcontent']);
$f = fopen($ff,'r');
while( ($line=fgetcsv($f))!==false ) { echo '<tr><td>'.implode('</td><td>',$line)."</td></tr>\n"; }
fclose($f);
unlink($ff);
}
}
if($empty) { echo '<tr><td>No CSV content received.</td></tr>'; }
?>
</table>
<?php endif; ?>
<h2>The CSV File</h2>
<form id="my-form" enctype="multipart/form-data" action="<?php echo($_SERVER['PHP_SELF']) ?>" method="post" accept-charset="utf-8">
<p>
How will you provide the CSV content?<br>
<label><input type="radio" id="getfile-upload" name="getfile" value="upload" onclick="providerClick()" checked> Upload File</label>
<label><input type="radio" id="getfile-specify" name="getfile" value="specify" onclick="providerClick()"> Otherwise</label>
</p>
<div id="input-other" style="display:none;">
<p style="max-width:5.8in; margin-top:1.25em; box-sizing:border-box;">
Either specify the location of the CSV file or paste in a CSV file's contents.
(Location can be either URL or directory location relative to document root.)
<br><textarea name="csvcontent" style="width:100%; height:2in;"></textarea>
</p>
</div>
<div id="input-upload" style="display:block;">
<p style="margin-top:1.25em;">
Upload file: <input type="file" name="csvupload" accept="text/csv">
</p>
</div>
<script type="text/javascript">
function providerClick()
{
if(document.getElementById("getfile-upload").checked)
{
document.getElementById("input-upload").style.display="block";
document.getElementById("input-other").style.display="none";
}
else
{
document.getElementById("input-other").style.display="block";
document.getElementById("input-upload").style.display="none";
}
}
</script>
<p style="margin-top:2em;">
<input type="submit" value="Create HTML Table" style="width:100%; max-width:5.8in; box-sizing:border-box;">
</p>
</form>
<p style="margin-top:2em; border-top:1px solid #666; width:fit-content; padding-top:.2em;">
© 2025 <a href="https://www.willmaster.com/">Will Bontrager Software LLC</a>
</div>
</body>
</html>
To install: Copy the code and save it as csv2html.php or other *.php file name. Then upload it to your server.
To use: Type the URL of csv2html.php into your browser. Then provide a CSV file and click the button.
The software has an easy-to-use interface and works with speed.
(This content first appeared in Possibilities newsletter.)
Will Bontrager


